• Skip to main content

Weekly Fifty

Exploring the wonders of creation through a 50mm lens...and other lenses too.

  • Subscribe
  • YouTube
  • About

Ice Shelter

March 13, 2024 Leave a Comment

DSC_0194.jpg

While Oklahoma doesn’t have anywhere near the same level of brutal winters as our friends a few states to the north, we do have ice storms from time to time that effectively shut things down all across town. Such was the case recently when we all woke up to sheets of ice covering everything, and subsequently closing the public schools along with Oklahome State University and some other institutions too. That meant my wife and I could spend the day just kind of bumming around with our kids, and seeing what fun could be gleaned from the ice-covered outdoors right out our front door.

The thing about shooting pictures of nature in mid-January, at least where I live, is that there isn’t a whole lot of color. Everything is mostly just shades of dull brown and faded green, which means finding photo opportunities is a bit trickier than normal. Thankfully I was armed with my D750 and 105mm macro lens–the combo that has, in recent months, became my favorite kit for general creative photography. Basically when in doubt, just shoot up close :) It’s worked for me many times before, and it certainly worked here.

What you’re looking at is a single berry on one of our holly bushes outside the house, not only frozen in time in the form of a photograph but also, quite literally, just frozen right there under a coating of fresh ice. I shot this at f/8, partly so I could get a slightly larger depth of field but also so I could get the berry nice and sharp. I also dialed in -1 exposure compensation because I’ve learned that my D750 just can’t meter properly when shooting outdoors on a snowy or icy day. It almost always overexposes, so I just manually underexpose and then adjust in Lightroom if I really need to. I really wanted to get my tripod to help with this shot but ended up doing it handheld, mostly because I just didn’t feel like going to the trouble. I do think it would have been worth it though, and probably serves as a lesson for what to do next time. Not that I’m looking forward to the next ice storm, but hopefully when it arrives I’ll be prepared :)
Read my educational photography articles at Digital Photography School

As above

March 6, 2024 Leave a Comment

DSC_9990.jpg

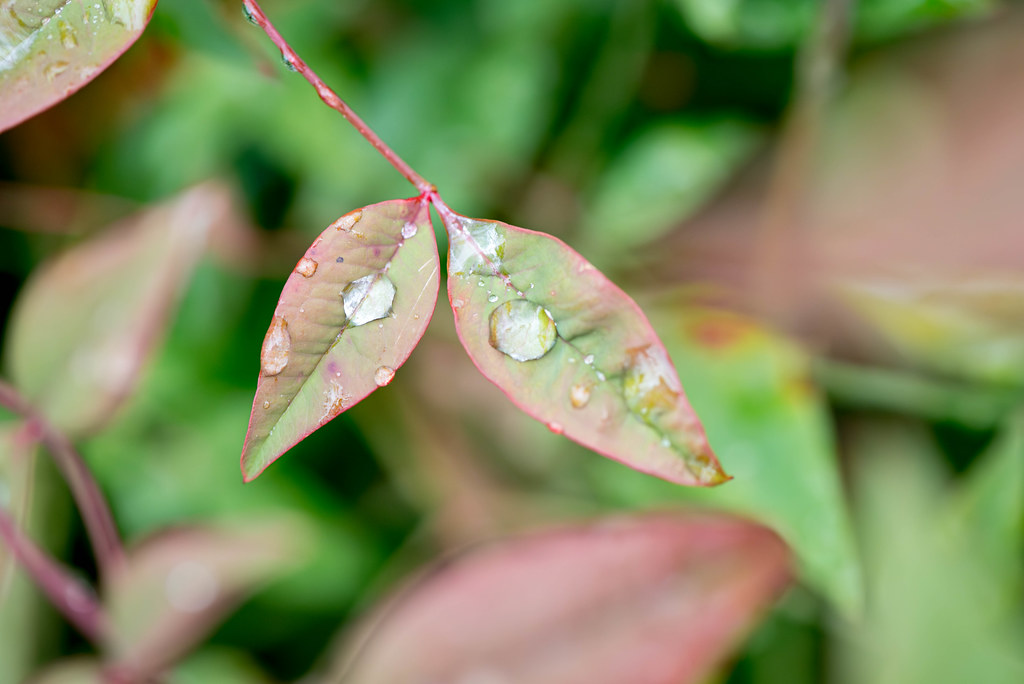
Lately I have found myself revisiting earlier compositions in an effort to see if I can build on the originals, revisit them in some kind of creative way, or just to see if I have learned anything since taking them. This shot is kind of like that in some ways, though not as far-reaching as some of my other photos like the mockingbird I shared two few weeks ago. Back in October I took a picture of a drop of water sitting at the intersection of three leaves, and while there were a lot of things I liked about it I didn’t appreciate how busy the entire image was. The drop in the center drew your eye right away, but then the rest of the frame was kind of a confusing mess of light and dark greens. Not that it was a bad picture, just that it left some room for improvement. This week’s image, then, demonstrates that improvement.

A couple of things to note right off the bat: Much like the original, this one is designed to draw the viewer’s attention with some water resting on a few leaves. Your eye is drawn to, as per my usual, more or less in the center of the frame and probably to the drops of water more than anything. But with this image the thing I really wanted to do was establish a sense of depth, of three-dimensional space, and making it feel like there were essential elements not just behind the subject but in front as well. Though perhaps the latter is a bit more subtle than is my usual, but maybe that’s a bug and not a feature. Who knows :)

I shot this with my D750 and 105mm f/2.8 macro lens on a cloudy afternoon in the wake of a cold rain shower, and much like the original I was basically just pointing my camera straight down. I shot this at f/8 though I did take a few others at f/4, which left a bit too much blurred out in the background, and had the unintended effect of removing a bit too much context from the shot. What’s really cool, at least in my opinion, is the blur of dull red on the right side of the frame. It’s a leaf in the foreground that I placed there deliberately (well, not literally, but I moved myself until that leave was where I wanted it) in order to give a subtle sense of three-dimensionality to the image. Foreground –> Subject –> Background. I’m pretty happy with it even though it’s not super noticeable. That’s kind of the point, and a bit of a reward, or Easter egg, for anyone who wants to look just a bit closer.

Read my educational photography articles at Digital Photography School

Strength and Peace

February 28, 2024 4 Comments

DSC_9934

Most of the photos I share here on Weekly Fifty are a bit more natural than this. That is, they are just objects without words and the viewer is allowed to draw his or her own conclusion or infer whatever meaning they prefer. This shot is a bit different, as there’s clearly a message being conveyed—albeit not necessarily by me, since I didn’t put this decoration on the branch. I merely came across the scene while out walking around the OSU campus one cold December afternoon, and used it as an opportunity to practice my photography.

I had my Nikon D750 and 105mm macro lens, which at this point has basically supplanted my Fuji X100F as my favorite camera kit for artistic shots such as this one. (The Fuji remains my camera of choice when photographing the people in my life, so much that it continues to be the only camera I take with on most of our trips to see family.) When I saw this two-piece ichthus-and-message metal ornament, each one about the size of a quarter, dangling from the brown branch I thought it would make for a compelling picture while also giving me a chance to experiment with a few different angles from which to capture the written portion.

At first I shot it head-on, but quickly realized that was, as Vader said to Luke Skywalker in Cloud City, all too easy. It just didn’t feel interesting or dynamic, and even cheapened the message a bit. I spent a few minutes shooting it from a bit higher, a bit lower, and from both the left and right sides while also experimenting with various apertures on my lens. The shot you see here ended up as my favorite, and I like how there’s just a bit of blur to the near and far part of the message. I’m a little unsure about the bright reflective surface of the ichthus or, rather, the circle containing the ichthus, and I did use Lightroom to lower the highlights in an attempt to salvage a bit of color and texture. It didn’t work as well as I had hoped, but it’s not that bad either. In the end I’m fine with how this turned out and, as usual, I’m just treating it as a learning opportunity. It’s nothing earth-shattering, but it’s not too bad either. And to whoever placed this trinket on the branch, thank you. I’m glad you feel blessed, and I hope others do as well :)

Read my educational photography articles at Digital Photography School

If that mockingbird don’t sing

February 21, 2024 Leave a Comment

DSC_9963

Nearly 12 years ago, way back in the waning weeks of 2012, I took this photo of a mockingbird outside the Spears School of Business building at Oklahoma State University. I had my Nikon D200 slung over my shoulder, 50mm lens firmly attached to its front, and if I remember correctly I think I was running to and fro from one building to the next while my coworkers and I got things ready for the annual chili cook-off. The air was biting cold despite the rising sun, and this bird was hanging out on a bush while morning crept over the Oklahoma plains. It was, and still remains, one of my favorite pictures I have ever taken–not because it’s so awesome, but because it helped me realize that yes, in fact, I could take cool photos with my fancy-pants new (used) camera and 50mm lens. It ignited a confidence in me that remains to this day, and I suppose that’s probably one reason why I have it printed, framed, and hung on the living room wall.

Well, fast-forward to the fall of 2023 and I once again found myself at the exact spot on campus where I took the photo of a mockingbird more than a decade earlier. Instead of my D200 and 50mm lens I had my D750 and 105mm macro lens, but other than that things were pretty much the same. The bird was the same, (though perhaps not the same, as the original bird is probably not around anymore. But who knows?) the location was the same, the background was the same, and even the weather was, you guessed it, about the same. I couldn’t have planned it any better, and I wanted to try to get a photo if even there was just a small chance. Turned out, there was :)

I followed this bird for a few minutes as it flew from here to there, always staying within the perimeter hedge, and was able to get close enough to snap the shot you see here. It’s pretty good if I don’t mind saying so, and much improved over the original in almost every measurable way, but there’s also no way I would have ever thought to snap this. Basically, you gotta give credit where credit is due.

Full disclosure though, I did cheat on this just a bit. Even though my lens was a longer focal length compared to the 50mm that I used on the first image, I still had to crop in quite a bit to get the shot you see here. Then I made use of the Super Resolution feature in Lightroom to mitigate the loss of detail and sharpness that happened due to the cropping. Is that taking things too far? I’m not really sure, but I think that’s one of the best things about modern digital photography: we have tools available to us that we can use, whether hardware or software, and it can be good to employ them when needed.

I didn’t hear the mockingbird sing this day, nor did I when I took the original, but I have listened to their songs on many occasions and at the end of the day I’m just glad we have these creatures in the world :)

Read my educational photography articles at Digital Photography School

Tulip Daisy

February 14, 2024 Leave a Comment

DSC_7975

In some ways this is a photo I have been thinking about for a long time. Years, in fact. Not this photo exactly, but some kind of composition involving the two artificial flowers you see here has been on my list of images to take for a good long while. My wife has had these two floral decorations, which she got from a longtime friend, adorning one of the rooms in our house for so long I can’t recall ever not having them around. I always enjoyed their simple design, translucent colors, and delicate elegance and almost every time I see them I think Hey, I should take a cool photo of these someday. And, as most people might expect, someday just never quite arrive. Until recently, that is.

The question that I always thought about when looking at these flowers was not necessarily how to take a photo of them, but how to take a cool photo of them. Anyone can point a camera at something and press the shutter button, but how could I go about making an image of this daisy and tulip that was compelling, creative, unique, or otherwise elevated above the mundane? The answer, or at least an answer, came to me when my wife and I were sitting by the Christmas tree back in December. I know, I know, it’s now mid February which makes this image a bit out of date, but I guess I just wasn’t really ready to share it yet. I went back and forth on this one since it’s pretty similar to a few other shots I shared already, but at the end of the day…well, it’s my blog so I get to set the rules 😀

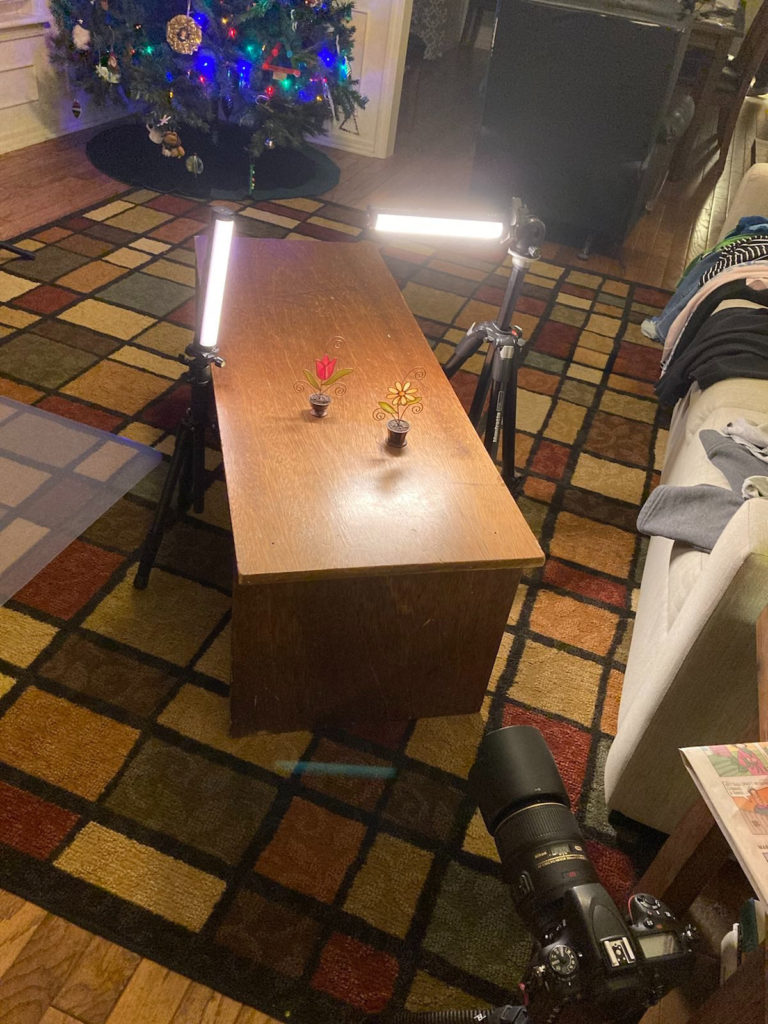
To get this shot I combined a few things I have been experimenting with lately: My macro lens, my Pavotube off-camera lights, and my knowledge of exposure, specifically depth of field, when shooting subjects a bit closer than normal. For a bit of context, here’s a behind-the-scenes look at this image:

I’ve got my Nikon D750 and 105mm f/2.8 macro lens, two Pavotubes set to a color temperature of 2800K, and our Christmas tree in the background. I had the room lights turned off so the only illumination on each of the tulips was coming from the Pavotubes, and the trickiest part of the whole setup was figuring out where to place the tulip in relation to the daisy and even the tree lights. I eventually decided on what you see here, with the daisy in front and on the right and the tulip behind it and on the left, with the curly wisps positioned precisely in front of the green, blue, and red lights of the tree. Make no mistake: nothing about this image was accidental; the entire composition was created deliberately with careful attention being paid to exposure, subject, background, and lighting.

This was a super fun photo to create and even though it’s now outdated by several weeks, I’m really excited to share it anyway. Though maybe one could say that it’s right on time, with spring just around the corner and flowers like this about to start appearing in lawns and meadows across the midwest. Here’s to new beginnings and new opportunities, and the ability to create cool compositions with a camera and some lights.

Read my educational photography articles at Digital Photography School

  • « Go to Previous Page
  • Page 1
  • Interim pages omitted …
  • Page 16
  • Page 17
  • Page 18
  • Page 19
  • Page 20
  • Interim pages omitted …
  • Page 135
  • Go to Next Page »

Copyright © 2025 <a rel="license"

[footer_backtotop]
Copyright © 2025 ·Infinity Pro · Genesis Framework by StudioPress · WordPress · Log in
Creative Commons License
This work is licensed under a Creative Commons Attribution-NonCommercial-NoDerivs 3.0 Unported License.