• Skip to main content

Weekly Fifty

Exploring the wonders of creation through a 50mm lens...and other lenses too.

  • Subscribe
  • YouTube
  • About

Gloss Mountain Sunset

May 8, 2024 1 Comment

DSC_0511.jpg

There’s a geological curiosity about two hours from where my wife and I live, just south of the Kansas border and surrounded by the kind of windswept plains and endless horizons that make you feel almost as if you have taken a few steps backward in time. It’s…well, I’m honestly not sure what this place is but it’s called Gloss Mountain. Gloss Mountain State Park, to be precise, and it’s one of those places that’s been on our “Hey we should go there someday” list for years but until recently we just never really took the time to make it happen. My wife and a friend went out there last fall, but in February we all decided to take a few hours and go there with both of our families. The weather wasn’t ideal, the timing could have been better, and perhaps the practicality of the whole endeavor wasn’t the greatest, but one thing we have learned over nearly two decades of being married is that if you’re waiting for the best time to do something, you could be waiting forever. And there might never actually be a best time to do something, so you just have to decide whether you’re simply going to do it or not. That’s kind of what we did with this trip: we picked a date, we planned when we would leave (i.e. after the kids were home from school) and we just made it happen.

So on a chilly, windy afternoon in mid-February my wife and our kids, along with our friends and their kids, loaded people, snacks, blankets, and sandwiches into two vehicles and drove nearly two hours out west to Gloss Mountain. Our goal was to make it there in time to see the sunset from atop the plateau, and while there was a bit more cloud cover than we anticipated, we still got to see a beautiful Midwestern painting in the sky, a pale shadow of which I attempted to capture in the above image.

I brought my Fuji X100F, Nikon D750, and 70-200mm f/2.8 lens–a bit overkill perhaps, but I wasn’t sure what to expect, exactly, having never been to Gloss Mountain before and not quite sure what I would need to capture a picture of the sunset. I took lots of photos and eventually settled on this one as my favorite from the bunch. Even though you can’t see the sun itself (We never did, to tell the truth. The clouds obscured it the whole time we were there.) the golden rays off in the distance tell you everything you need to know. I had a few shots without the plateau on the left, but didn’t like them as much because they didn’t really do a great job of conveying a sense of scale–which is the most interesting part of a shot like this, in my opinion. In fact, there were two compositional decisions I made to try to capture the scale of the scene: the first was including the plateau, and the second was to make sure to get the road in the shot as well. I had some images without it but realized that, while artificial, the road actually served a useful purpose in helping the viewer understand the sheer size of all the natural elements present in the scene.

It wasn’t long after I took this shot that we succumbed to both weather and time, and returned to our vehicles for the drive back home. It didn’t take long for us to start talking about a return trip, hopefully sooner rather than later. We might wait for an ideal time, but hopefully we will just decide to make it happen and then do it :)

Read my educational photography articles at Digital Photography School

Pothos Progeny

May 1, 2024 Leave a Comment

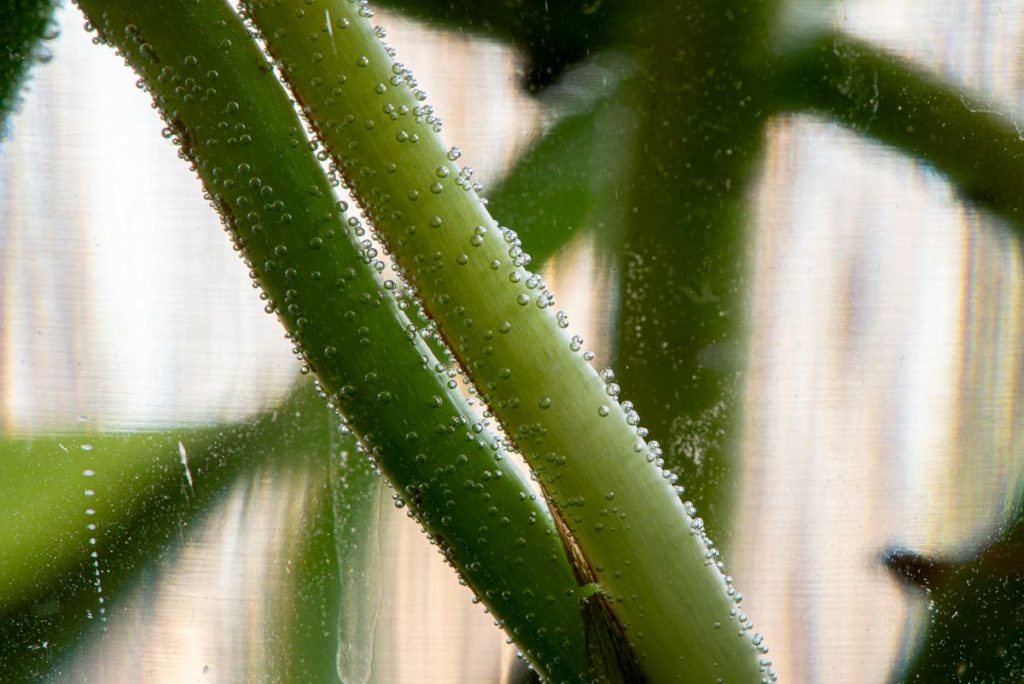
DSC_0570-Edit.jpg

A few months ago I noted, in my 2023 Wrapup Video, that one of my goals for 2024 was to try my hand at focus stacking. Not handheld impromptu focus stacking, but real actual focus stacking in a controlled environment with precise movements. The kind that you have to plan out and take care to pull off in order to get a very specific kind of shot. I don’t know if this image is the greatest example of focus stacking, but speaking personally, it is the best focus-stacked shot I have ever taken. Do I have room to improve? Of course. Did I learn a lot? Absolutely. And that, by itself, makes this a photo worth taking.

What you’re looking at here is a close-up of a cutting my wife took from her pothos plant, with the goal of getting it to the point where it’s healthy enough to be potted so it can grow on its own. I saw it sitting on the windowsill while I was washing dishes and, after noticing all the tiny bubbles on the green stalks, decided to turn it into a close-up photo opportunity. I moved it to another windowsill where I could set up my camera gear, got out a tripod, my Nikon D750, and 105mm f/2.8 macro lens, and set to work. I quickly realized that the tolerances I was dealing with were so crazy small that I would need to up my game a little. A single shot wouldn’t work; I needed to do some stacking.

To wit: Each of the green stalks is about a quarter inch in diameter. That means each bubble is about…oh, I dunno. 1/32 or 1/64 inch in diameter. Super duper small, in other words. My camera was so close that when I shot this at f/11, the depth of field was about the same: 1/32 or 1/64 inch. One solution, then, would be to (naturally, of course) shoot at a much smaller aperture in order to get more bubbles in focus. But that had the unfortunate side effect of putting too much else in focus too:

The same composition, shot at f/32.

This image was fine, I guess, but I really liked how shooting at wider apertures obscured so much else in the frame. But wider apertures meant that not enough of what I wanted to be in focus was actually in focus. You have to choose one or the other…except when you can have both. Enter focus stacking.

To get the final image I took a series of exposures at f/8, carefully adjusting the focus on each one to move from the close side of the stalk to the far side. Then I loaded the series in Photoshop and had it merge the in-focus parts of each of the layers into a single image, which I then loaded back into Lightroom for some final coloring adjustments. Just so we’re clear: this is not cropped. My camera lens was just really close to the subject.

I really like how this turned out, and I can certainly see the practicality of focus stacking in a controlled environment. It was fun to take this, enjoyable to edit, and most importantly, my wife liked it too :)

Read my educational photography articles at Digital Photography School

Rainbow Swirl

April 24, 2024 4 Comments

DSC_0408.jpg

Ok so you know how I constantly talk about using Weekly Fifty as a tool to help me learn, grow, and improve as a photographer? Well this shot is a clear example of the kind of the progression that I am always looking for, and it happened directly after I took the photo last week. In that sense, this could be thought of almost as a Part Deux to the stylized monochromatic image of a five-spoked wheel of light that I shared seven days ago. It’s like the original, but different in some key ways that demonstrate a clear sense of personal growth. It also cannot simply stand on its own, as I would have never taken this brilliantly-colored image without first shooting its black-and-white counterpart.

Basically, here’s what happened. After taking the photo of five white lights arrayed in a star pattern above a clear glass ball, editing it just a bit in Lightroom, and uploading it to Flickr, I immediately thought about ways to improve upon it. My first, and perhaps most obvious, thought was to use color. Just imagine a similar composition but full of brilliant greens, blues, reds, and more! And so I did. I put my memory card back in my camera, went back to the same setting I had just created with the lights above the glass ball sitting on a whiteboard, and got to work. I changed the color of each of the lights to random HSL values, like reaching into a bag of skittles and just going with whatever came out. The result was fine, and I took a few shots from straight-down like I had done with the previous image, but something was…missing. It was too derivative, and I realized that just changing the colors wasn’t enough.

I then set each of the five lights to specific colors of the spectrum: red, orange, yellow, green, and blue. I also changed my physical position to more of a three-quarters view instead of straight down, and spent a few minutes just sort of roving about while photographing the illuminated glass ball from a variety of angles. I quickly realized that doing so gave me exactly what I didn’t even know was missing, and helped not only elevate the image but transform it into an entirely new creative composition. Instead of looking straight down at five colored bars of light, I was now looking at a multi-hued star suspended in midair surrounded by brilliant streaks of luminescence, almost as if someone had taken an electromagnetic paintbrush and spread streaks of color around the ball from all across the visible spectrum. What really sold me on this image was the green in the top-left, which almost gives a sense of kinetic energy and motion as if the ball were simultaneously rolling while remaining perfectly still.

This shot looks almost artificial, like something an AI program would generate, but I promise you it’s all real and captured completely in-camera. It was gloriously fun and rewarding to take, and made me practically giddy at the thought of what might come next.

Thanks Phil and Tom :)

Read my educational photography articles at Digital Photography School

Star Cycle

April 17, 2024 4 Comments

DSC_0352.jpg

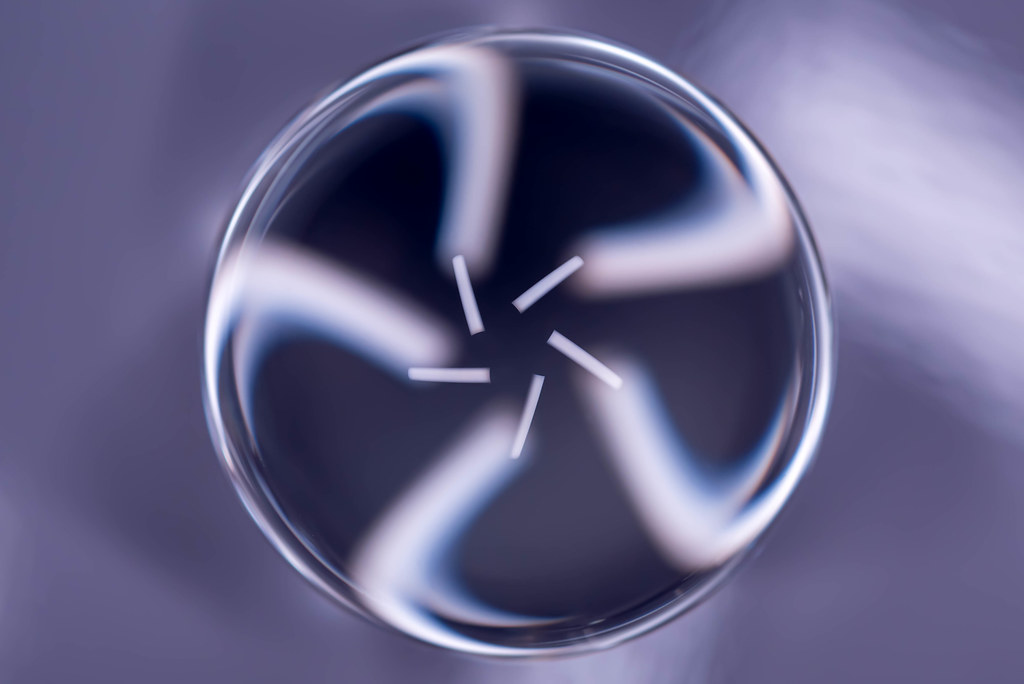
I feel like this post should come with a bit of a disclaimer or warning, kind of in the vein of Monty Python: And now for something completely different. This is quite unlike a lot of the photos I normally post here on Weekly Fifty, but at the same time it also has echoes of some elements that eagle-eyed viewers might notice or remember. But, as my dad would say, first things first. Credit for this shot goes primarily to two people: My brother Phil and my brother Tom. Phil has been into creative macro photography for a super long time, and recently recommended that I get a glass sphere just to see what kind of interesting photographs I could get with it. I found one on Amazon for less than ten dollars and while it’s probably not the highest-quality photo sphere in the world…oh my goodness is it awesome :) I’ve been trying it in different situations just to get a feel for it and see what it can do, or, what I can do with it, and this is the first shot I really feel comfortable sharing with a broader audience.

Phil, thanks for the idea!

Next, I want to give a big shout-out to my brother Tom who built the star-pattern fixture that made this image possible. Thanks Tom!

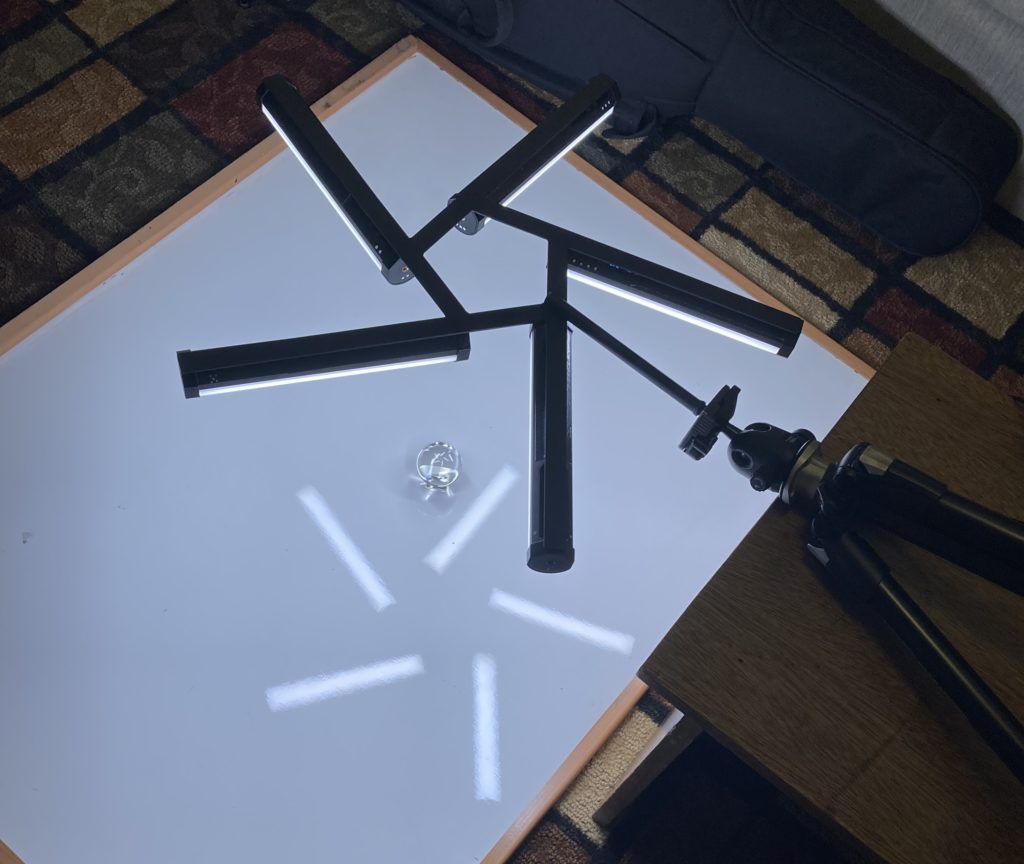
So on to the photo. What you’re looking at here is five Nanlite Pavotubes magnetically attached to the star-pattern device, which is attached to a tripod, which is laying on a coffee table, which is next to a whiteboard, on which rests the glass sphere. You know what? How about just looking at the setup with a behind-the-scenes photo:

When I gave Tom the specs for the star pattern I specifically requested that he leave room for a hole in the middle large enough to poke my camera lens through, and while I don’t use this feature all that often it sure is nice to have. To get the final shot I used my Nikon D750 and 105mm macro lens, set to f/6.7, 1/250 second, ISO 400, and stood somewhat hunched over the entire setup with my camera stuck through the middle of the star. It was a little weird and felt a bit strange, but the result is an image that is pretty unique among my entire portfolio. It even looks like it’s shot in black and white, but that’s just because all the colors you see here are just white light and natural shadows. I think my favorite part isn’t necessarily the star pattern but the way the light bends and warps at the edge of the sphere, almost like the black hole in Interstellar. It was a really fun photo to set up and shoot, and it gives me a few ideas for something else to try 😉

Read my educational photography articles at Digital Photography School

Mario Karting

April 10, 2024 Leave a Comment

DSC_0257.jpg

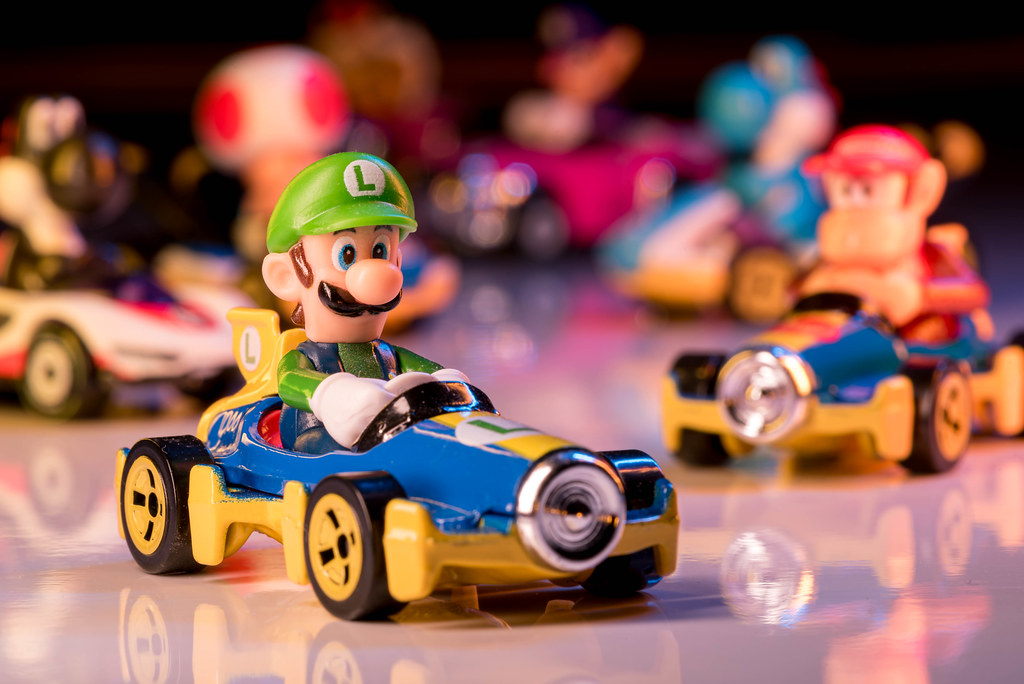
For the past few years one of our kids’ favorite video games has been Mario Kart. They started on the SNES original and then graduated to Mario Kart Wii, then Mario Kart 8 (not Deluxe; we only have a Wii-U, not a Switch) and also dabbled in Mario Kart 64, Mario Kart 7, and even Mario Kart DS. So it seemed only fitting that we get them some Mario Kart Hot Wheels cars for Christmas, and I can assure you these little vehicles were very well received :) I also thought that they would be fun subjects to photograph, and finally gave it a try on a recent evening after the sun was down and the kids weren’t yet in bed. They, like in last week’s picture of Link, helped me compose the shot: placement of cars, color and direction of lights, and even the aperture of the lens to control depth of field.

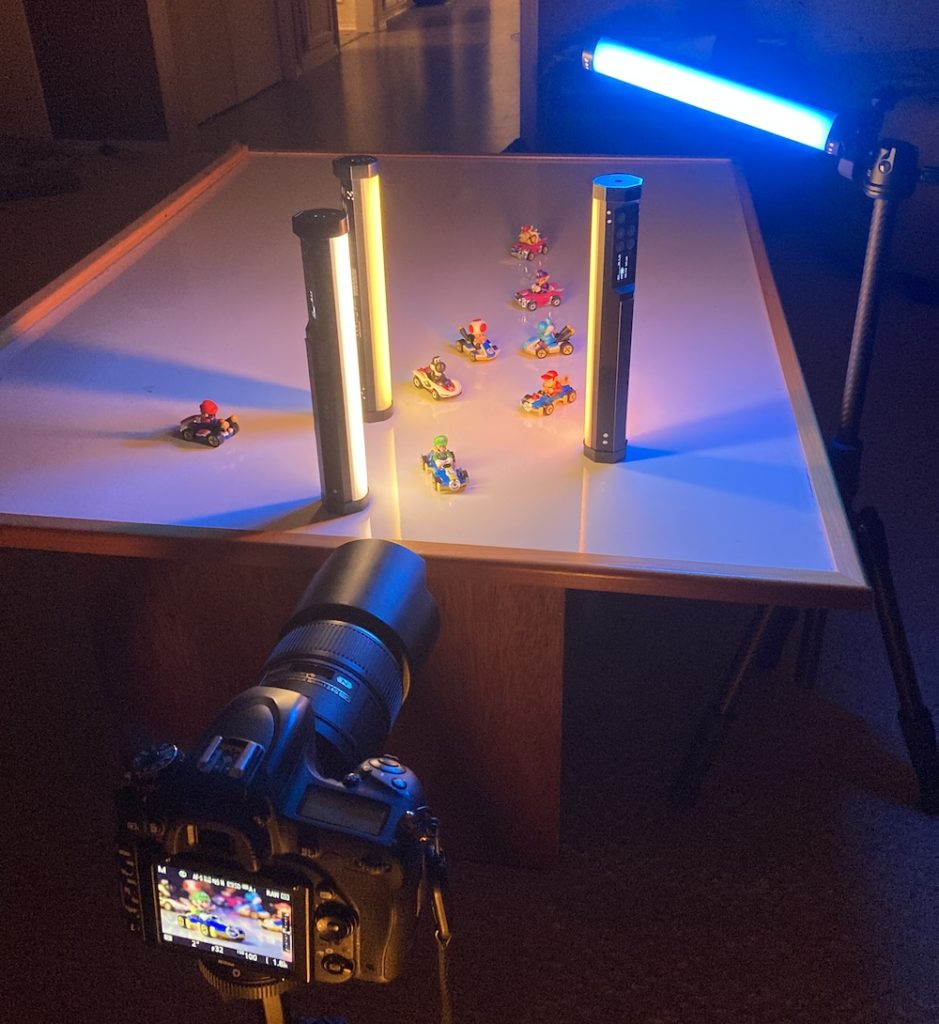
We didn’t use much in the way of colored lighting, but instead used normal white light but set to different color temperatures. I don’t remember exactly what we used, but we did make sure to include a bit of blue overhead light to add a bit of extra dimension to all the characters, and enhance the reflections a bit too. One of the fun things about this was figuring out the positions of all the racers, even Bowser way in the back. In the finished shot you can tell that there’s someone behind Waluigi, but can’t quite tell who, and those subtleties were really cool to play around with.

I used a pretty small aperture of f/32 to help keep depth of field under control, and used ISO 100 to keep the image as clean as possible. That gave me a shutter speed of 2 seconds, which might seem slightly ironic given that this is a shot of some very fast racers :) As you might expect though, the best part of this image was the experience of doing all this with my kids.

Read my educational photography articles at Digital Photography School

  • « Go to Previous Page
  • Page 1
  • Interim pages omitted …
  • Page 11
  • Page 12
  • Page 13
  • Page 14
  • Page 15
  • Interim pages omitted …
  • Page 132
  • Go to Next Page »

Copyright © 2025 <a rel="license"

[footer_backtotop]
Copyright © 2025 ·Infinity Pro · Genesis Framework by StudioPress · WordPress · Log in
Creative Commons License
This work is licensed under a Creative Commons Attribution-NonCommercial-NoDerivs 3.0 Unported License.