• Skip to main content

Weekly Fifty

Exploring the wonders of creation through a 50mm lens...and other lenses too.

  • Subscribe
  • YouTube
  • About

Charge

August 30, 2017 16 Comments

Chargehttps://www.weeklyfifty.com/wp-content/uploads/2017/06/WeeklyFifty-2017-August-30-Charge.mp3

Every year my family goes to Milford Lake in Kansas for a few days of playing on the beach, going on boat rides, and really just spending time with each other. As I was preparing for this year’s trip I had to decide what gear to bring, which is always a bit of a tricky proposition because I don’t want to get stuck in the trap of focusing more on my camera stuff than I am on my family, but I also didn’t want to leave anything at home that could be used to get some fun photos. In the end I might have actually gone a bit overboard with gear (isn’t that always the case?) but made sure that I wasn’t getting too distracted with picture-taking during the days we were at the lake. Sometimes I intentionally left my camera at the cabin so I wouldn’t be caught up in taking dozens of photos, and at other times I used my camera only for specific purposes and then put it away when I was done. I also brought out good old-fashioned pocket camera we’ve had for years, because sometimes all you need is something small and portable to capture the memories you want.

I’ve discovered over the years that while 50mm is a fantastic focal length in many situations, it’s not my preferred lens when I know I’m mostly going to be with and around family. For that I turn to something wider like my 35mm, and if I know I’m going to be away from the action I also bring along my 70-200. I did bring my 50mm lens on the trip specifically so I could take some photos for my Weekly Fifty blog, and it stayed on a shelf the entire time except for when I specifically went out with my brother Andy to capture some shots of lightning as a storm rolled through the area. At first I ran down to the beach near our cabins but soon realized that the surrounding trees and camping areas were obscuring most of the incoming clouds. When that wasn’t working out I went back to the cabin, found my big brother, and asked if he wanted to drive down to the boat launch and set up shop there to catch some lightning shots. He grabbed his camera gear and off we went, hoping to do the best with what we had.

Andy was better prepared than I, having a nice tripod and a remote shutter release whereas I had to borrow my dad’s tripod and use a 30-second timer. This gave Andy the ability to shoot in Bulb mode (basically opening the shutter for as long as he wanted to, and then clicking his remote shutter release again to close it) whereas my 30-second exposures had to be done over and over manually. It wasn’t a big problem though, and every time my 30 seconds was up I just clicked the shutter button again and sat there waiting.

In fact, it was the waiting and uncertainty which were the most difficult parts of getting this shot. We had no idea where the lightning would come from, where it would strike, or how much time we even had to work with before the rain started falling. Because of this a wider lens would have been good since it would have allowed more room for error, but I stuck with my Nifty Fifty just because I wanted to see what would happen. Turns out I got a shot that I really like, and I can honestly say it’s the best lightning picture I’ve ever taken. It did require some postprocessing (yay for shooting in RAW!) but after I brought out some of the colors in the clouds and in the background I was even more pleased with how the image turned out.

The one thing I don’t quite understand is why the trees on the lower-left corner have a bit of a white halo around them. It’s not anything I did in Photoshop, and if you look closely the trees on the lower-right have a similar type of glow. I did raise the shadows quite a bit in order to bring out some color in the sky, but I don’t think that was causing the halo effect. Rather I’m guessing it was the flash of light from the lightning bolt that provided some backlighting to the trees. Whatever caused it, I don’t really mind it except that it tends to look like a poor job of photoshopping which, I can fairly confidently say, is not the case.

If you like this shot I would encourage you to try this sort of thing on your own, and the next time you see a storm rolling in put your camera on a tripod and see what you can come up with :)

Read my educational photography articles at Digital Photography School

Mono

August 23, 2017 16 Comments

Monohttps://www.weeklyfifty.com/wp-content/uploads/2017/06/WeeklyFifty-2017-August-23-Mono.mp3

This shot surprised me.

I was headed back to my office after running an errand on campus and, as is often the case, I was carting my camera and close-up filters on the off-chance that something caught my eye and caused me to stop for a picture. And boy howdy, something sure did. This was taken on the magnolia tree mere inches from my office building, and as I stopped to look at the flowers I though of taking a top-down picture which was, frankly, unlike any other magnolia photo I had taken before. I thought it would merely be a fun experiment and very little would come of it, but as I was looking at the photos in Lightroom this one really stood out to me. It required very little in terms of editing and all I did to crop it was bring in the sides to make it a square image (which I rarely do, especially for my Weekly Fifty pics) and juuuuuust a tad bit on the top as well.

The result was an image that I was not at all expecting, and one that, if nothing else, is certainly unique as I scan through my Flickr page. I don’t normally shoot my subjects from directly above, and when I use my +4 close-up filter I don’t normally shoot at f/2.8…and yet here’s both of those. I also generally use more colors than this, but here you see very little in terms of variation and the entire image is really just white and yellow. Add to that the fact that it’s cropped to be square and…well, you see what I mean.

I’m honestly not sure what to make of this picture; I think I like it but I’m not really sure. So in the end I’m just going to say that it’s different, at least for me, and leave it at that.

Taking the photo only took about a minute and I had to hold my camera in my right hand while steadying the flower (which was just a few feet off the ground) with my left hand. I used the center focus point and shot about 12 pictures hoping one would be in focus, and used a couple different aperture settings in order to get a good combination of depth of field as well as overall sharpness. In the end it was this image, with mere millimeters of wiggle room in terms of DOF, that stood out to me the most. Most of the others from this series were either out of focus, off-center in terms of composition, or had bright sunlight poking through the white flower petals–all things that I was trying to avoid. It was fun to try something new and it gives me a few ideas to think about for future photos as well.

Read my educational photography articles at Digital Photography School

Uplift

August 16, 2017 6 Comments

Uplifthttps://www.weeklyfifty.com/wp-content/uploads/2017/06/WeeklyFifty-2017-August-16-Uplift.mp3

Ah, tis the season once again when flowers are in full bloom, the weather is mild, and the Lord watches as photographers everywhere set out to enjoy and document the intricate wonders of His world. Each summer one of my favorite subjects to photograph is none other than the magnolia flower, as visitors to this blog no doubt know by now, and 2017 has been no exception. Of course I enjoy taking pictures of other flowers as well, but it’s the size, features, and explosions of color that often accompany the magnolia flower that make it such a joy to photograph. Add in a little daylight and a close-up filter and you’ve got the recipe for some pretty cool pictures.

This one, like most of the magnolia photos I’ve taken, was on the OSU campus within spitting distance of Theta Pond. I was walking past the tree when I saw several flowers relatively close to the ground, and this particular one a bit above my head which meant that I immediately dismissed it as a potential photo subject. I did take a bit of a detour over to it just in case it turned out to have something of value, photographically speaking, and snapped a picture of it (because why not?) before deciding to move on.

If you’re a regular reader you might also know by now that I’m not generally in the habit of chimping, or looking at the screen on the back of my camera, after taking photos. I like to trust my instincts and look at my pictures on a big computer screen, and when I’m looking at the LCD on my camera it’s usually just to check to see if I nailed focus. This time though, I checked specifically to see how the picture turned out and I was honestly kind of surprised. I quite liked what I saw, so I stopped and went back to take a few more.

There were a couple of elements in this image that I tried to use intentionally as a way of creating a complete composition rather than simply snapping a shot of this flower. First I used the orange and green leaves in the foreground to frame the subject, which required me to scoot around and shift my viewpoint quite a bit. I know there’s some empty space on the right-hand side but I’m OK with that since it felt just a little too claustrophobic to have the leaves looming large and blocking out absolutely everything on the sides. The second compositional element, which I assure you was quite intentional, was the light spots in the background behind the flower. I wanted them to surround the flower and not intersect with its boundary, and to get this to work properly I actually had to chimp quite a bit while continually adjusting my viewpoint. It might be kind of a subtle effect but I do think it add an altogether not insignificant amount of flair to the picture.

There was also the issue of exposure settings: I wanted the flower to be sharp but also wanted a shallow depth of field. F/4 blew out the background a bit too much and f/8 was not enough, so I found a sweet spot at f/6.7 which really did the job nicely. I think the shot turned out very close to what I was going for, and if I compare it to a similar picture I took last summer I actually prefer the newer one because it feels like more of a complete, considered composition.

Read my educational photography articles at Digital Photography School

Backyard Bunny

August 9, 2017 12 Comments

Backyard Bunnyhttps://www.weeklyfifty.com/wp-content/uploads/2017/06/WeeklyFifty-2017-August-9-Backyard-Bunny.mp3

This was a tough one.

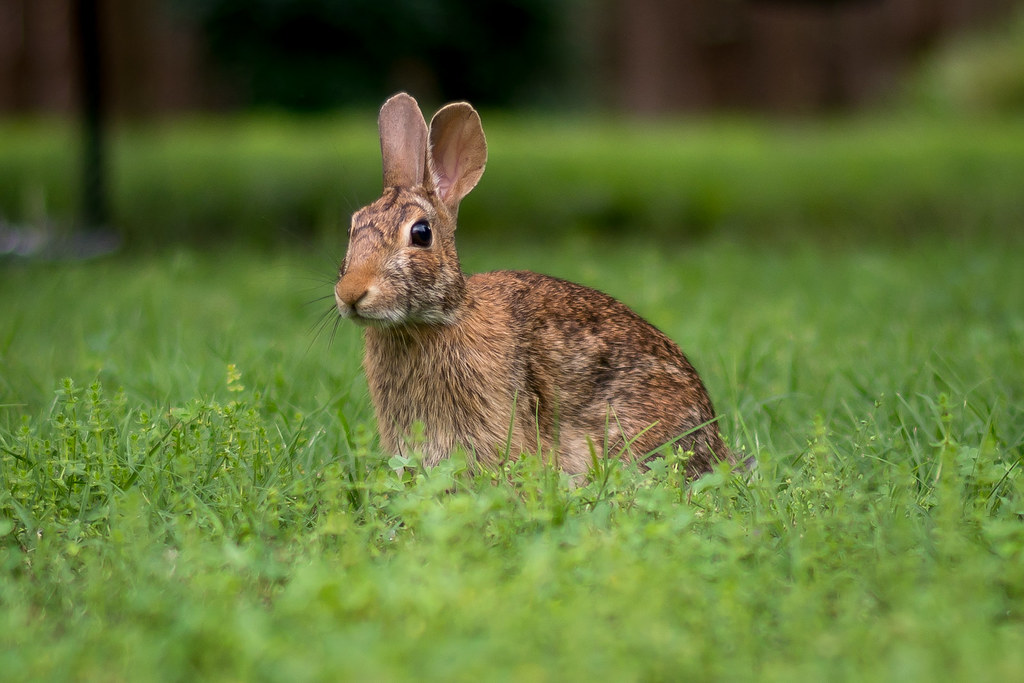
Not just a tricky photo to shoot, but a difficult decision in terms of which photo to post. I came away from this particular picture session, if you could call it that, with a couple dozen images that I narrowed down to two finalists. The other was a similar photo but with more of a profile view of the rabbit, and I thought both were pretty solid. In a break from tradition I honestly couldn’t figure out which one to post as this week’s featured Weekly Fifty image, so I posed the question to my Instagram followers and decided to let them choose:

View this post on Instagram

A post shared by Simon (@sringsmuth)

After one day of voting I tallied the results and this one was the winner, with the bottom picture coming in a close second. (The vote was six to five, so a close call to be sure.) I did take the advice of one of the commenters and crop in a bit more, which I think worked well and helped put a clear emphasis on the bunny as opposed to the surroundings.

This was one of those photos I certainly did not plan for, and was only able to get due to what I can only attribute to dumb luck and some (apparently) good-tasting weeds and grass in my back yard. My kids, my wife, and I were out in the back yard earlier this summer and as often happens there was a rabbit or two making a meal out of our lawn. The light was good and one of the rabbits didn’t seem to mind all the human activity, so I ran inside and came back with my D7100 and 50mm lens. The trouble with that setup is that it’s not exactly ideal for this type of picture since it requires the photographer to get close, very close, to his or her subject and when working with animals this can be a tricky bit of business.

I got down to a prone position and did a sort of army-crawl as I carefully approached the rabbit, who was well aware that he was being watched. Fortunately he seemed more interested in filling his tummy than running from a human with a big camera, though he did keep a careful eye on my activity and hopped out of the way when I started to get a bit too close for comfort. This crawl-shoot-hop-crawl again set of maneuvers continued for a few minutes while my wife and kids watched from the porch, all the while I was shooting at f/1.8 (to get as much depth of field as possible given the size and distance of my subject) and taking lots of shots hoping one would work out.

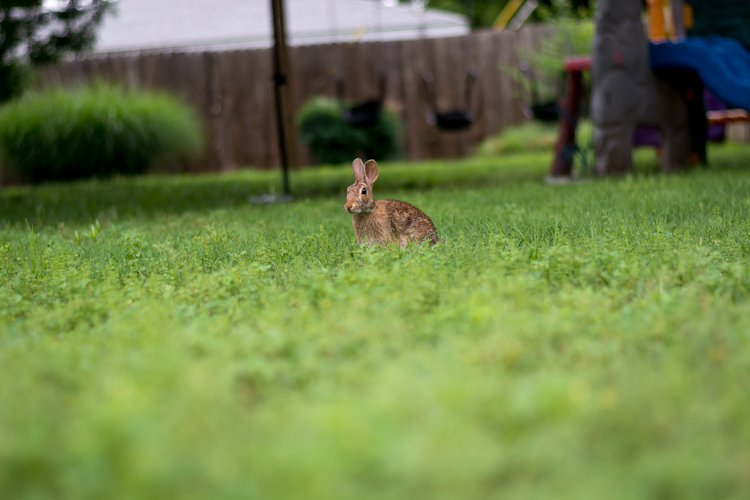
When I loaded the images into Lightroom I was a little disappointed initially because in every shot the rabbit was so very small in the frame:

The un-cropped (and un-straightened) original image.

Not only that, but look at how busy the photo is! You’ve got a ton of grass in the foreground, a plastic play set on the right, a rope swing, some tire swings, a fence, and the list goes on. I thought the series of pictures was all for naught…until I started cropping. And this is where the magic of megapixels really starts to shine. Most cameras today clock in at around 16-24 megapixels, and my D7100 is right up there too. Thanks to the 24 megapixel sensor I was able to crop in really close to the rabbit and not really lose much in the process. It’s nearly a 1:1 crop, meaning there is almost no room left for cropping without actually enlarging the pixels, but even so the final image (which is about 2.5 megapixels, or about 10% the size of the original) appears to still have plenty of color, contrast, detail, and sharpness. There’s probably not enough data to mage a big print, like a wall-sized canvas, but for showing on screen or sharing on social media it’s just fine.

I’ve often been known to tell photographers to not be afraid of pushing their gear: shoot at high ISO values, search the camera menus for tweaks to try, and a little rain or snow probably won’t hurt things. I don’t often advise people to do extreme image cropping, but…well, I guess the proof, you could say, is in the pudding. Or if you’re Samwise Gamgee, the coney stew.

Read my educational photography articles at Digital Photography School

Signal

August 2, 2017 4 Comments

Signalhttps://www.weeklyfifty.com/wp-content/uploads/2017/06/WeeklyFifty-2017-August-2-Signal.mp3

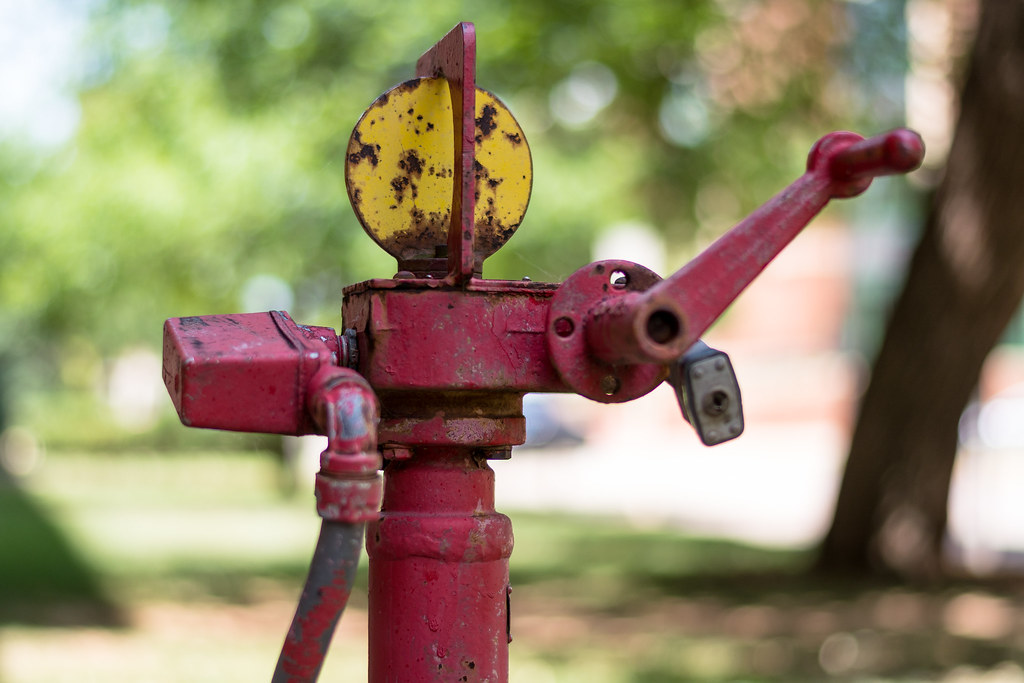
Normally when I post pictures of anything relating to nature, it’s with a disclaimer that I don’t know what it actually is that I’m looking it whether it’s a flower, tree, shrub, leaf, etc. Well, the same goes for this thing here in that I don’t really know what it is, but it reminds me of an old-time traffic signal hence the name I chose for it. I think it’s actually more a water spigot though I have no idea why the flap at the top is yellow. And it’s this clash of red and yellow that attracted me to the scene in the first place and made me pause to take a photo. I thought it was a fun and interesting object, so why not snap its picture?

There’s something else here too, which is the blurry background–or specifically the spots of light in the top-right corner of the frame. My brother Andy often shoots with a 50mm lens, and often wide open, such that it’s not uncommon for his pictures of friends, family, or just everyday objects to have a nice sense of separation between the subject and the background. One of the effects of using such wide apertures is that not only will the background get blurry, but spots of light will tend to get distorted and oval-shaped near the corners of the image. Andy’s pictures often display this effect and in my opinion it’s a nice, pleasing visual artifact that helps bring the viewer’s attention to the main subject of the picture. So when I photographed this…thing, I deliberately composed the shot such that the background would contain hundreds of little light points as the sunlight broke through the trees. The result was a swirling mass of blurry bokeh, and if you look in the top-right and bottom-right corners the balls of light are misshapen and look like little footballs.

(More information on this effect can be found here.)

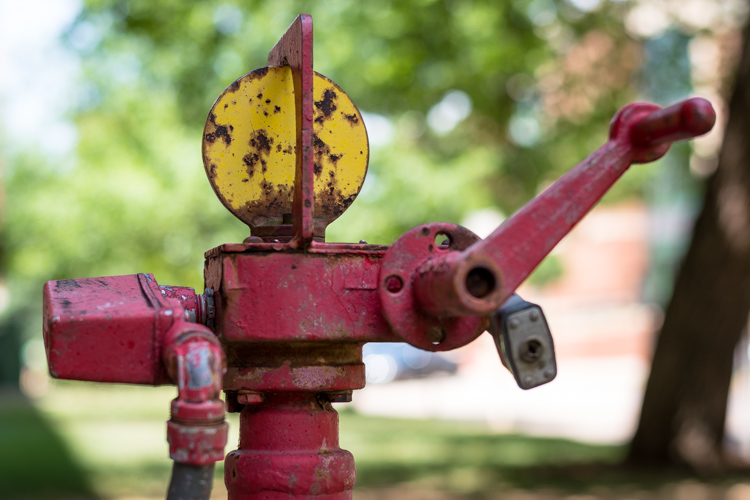
In order to get the desired cat-eye effect I had to shoot wide open at f/1.8, which meant that the rotating arm in the foreground ended up being more blurry than I would have liked as well as an overall lack of sharpness compared to the same image shot at f/2.8. But when I looked at the f/2.8 version it just didn’t have the same pleasing background effect as you can see here:

Sure the 2.8 version is sharper, but the background is much weaker as a result of the smaller aperture and it’s not a tradeoff I was willing to make when deciding which image to post for this week’s picture. It’s a fun technique to play with and if you’re looking for something to try with your camera then I’d recommend giving this a try, especially if you have a nice fast prime lens :)


Read my educational photography articles at Digital Photography School

  • « Go to Previous Page
  • Page 1
  • Interim pages omitted …
  • Page 97
  • Page 98
  • Page 99
  • Page 100
  • Page 101
  • Interim pages omitted …
  • Page 146
  • Go to Next Page »

Copyright © 2026 Creative Commons License
This work is licensed under a Creative Commons Attribution-NonCommercial-NoDerivs 3.0 Unported License.